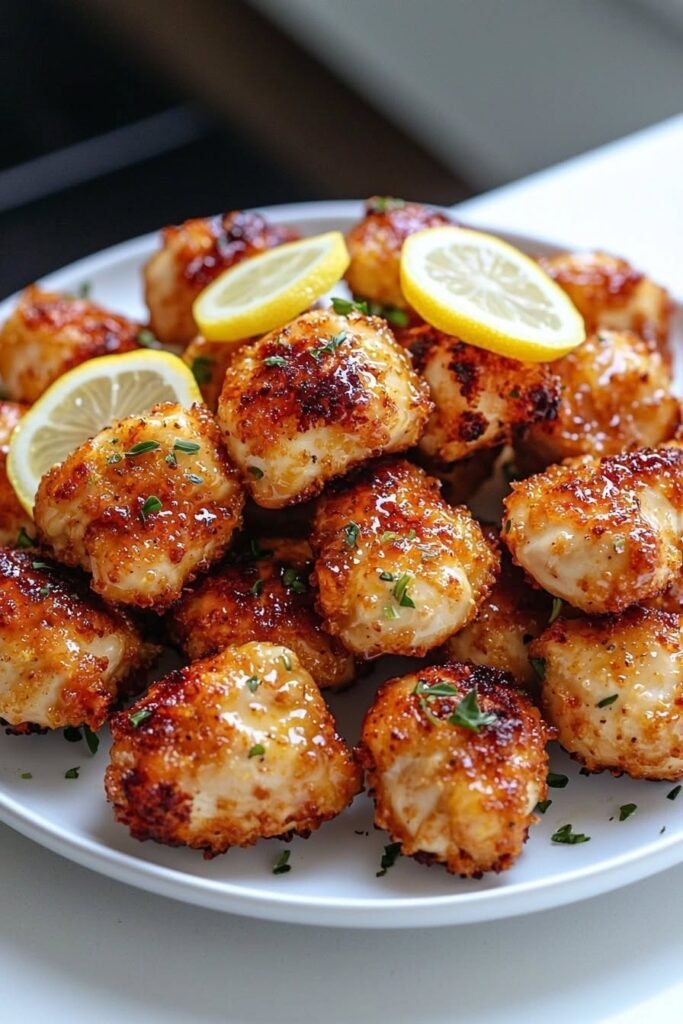

Juicy, tender chicken bites marinated in fresh lemon, garlic, soy sauce, and spices, then pan-seared until beautifully golden and finished with a buttery lemon-garlic glaze.
This recipe is simple, but the order of preparation and cooking technique makes a huge difference. The goal is chicken that is golden and lightly crisp outside, juicy inside, and coated in a glossy, buttery lemon-garlic sauce.
🕒 Preparation & Cooking Time
- Prep time: 15 minutes
- Marinating time: 30 minutes–6 hours
- Cooking time: 10–12 minutes
- Total active time: About 25–30 minutes
- Servings: 3–4
🛒 Ingredients
🍗 For the Chicken
- 500 g boneless chicken thighs or chicken breast
- 1 tbsp cornflour/cornstarch — optional, for a lightly crisp exterior
- 1 tbsp cooking oil, for cooking
Chicken thighs are recommended because they stay juicier and are more forgiving if slightly overcooked. Chicken breast also works well but needs more careful cooking.
Cut the chicken into 2.5–3.5 cm (1–1½ inch) bite-sized pieces.
🧄 For the Lemon-Garlic Marinade
- 4–6 cloves fresh garlic, finely minced
- 2 tbsp fresh lemon juice
- 1 tbsp lemon zest
- 2 tbsp olive oil
- 1 tbsp soy sauce
- 1 tsp honey
- 1 tsp paprika
- ½ tsp freshly ground black pepper
- ½ tsp salt
- ½ tsp chili flakes — optional
- ¼ tsp cumin powder — optional, for extra depth
Why these ingredients work
Lemon juice gives the chicken brightness and mild tenderizing action.
Lemon zest adds concentrated citrus aroma without making the chicken overly sour.
Garlic provides the main savory aroma.
Soy sauce contributes saltiness and umami.
Honey balances the acidity and helps the chicken develop beautiful caramelized edges.
Olive oil distributes the marinade ingredients and helps with browning.
Paprika and chili flakes add color, warmth, and mild heat.
🧈 For the Lemon-Garlic Glaze
- 1 tbsp butter
- 1 tsp fresh minced garlic
- 1–2 tbsp fresh lemon juice
- 1 tsp honey
- 1–2 tbsp water or chicken stock
- Pinch of chili flakes, optional
- ¼ tsp black pepper
- Small pinch of salt, only if needed
🌿 For Garnishing
- 2 tbsp freshly chopped parsley or coriander
- Lemon wedges
- A little freshly grated lemon zest, optional
🔪 Step 1 — Prepare the Chicken
Place the chicken on a clean board and pat it completely dry with paper towels.
This step is important because excess moisture creates steam instead of browning.
Cut the chicken into pieces of roughly equal size.
If using particularly thick pieces, you can lightly score them with a knife.
🧠 Why this matters
- Dry surface = better browning
- Equal pieces = even cooking
- Similar thickness = fewer overcooked pieces
- Scoring thicker pieces = slightly better seasoning penetration
Do not cut the chicken too small. Bite-sized pieces that are around 1–1½ inches remain much juicier.
🧄 Step 2 — Make the Marinade
In a large bowl, combine:
- minced garlic
- lemon juice
- lemon zest
- olive oil
- soy sauce
- honey
- paprika
- black pepper
- salt
- chili flakes
- cumin, if using
Whisk everything together until well combined.
Add the chicken and toss thoroughly until every piece is coated.
Cover the bowl and refrigerate.
⏳ Step 3 — Marinate the Chicken
For the best texture:
- 30 minutes: Good
- 2–6 hours: Best
- Up to 12 hours: Maximum recommended
Because the marinade contains lemon juice, avoid leaving the chicken in it for excessively long periods. Too much acid for too long can negatively affect the texture.
Important
Take the chicken out of the refrigerator about 10–15 minutes before cooking.
Don’t leave raw chicken sitting at room temperature for a long time.
🔥 Step 4 — Add Cornflour for Better Browning
Just before cooking, drain off excessive marinade.
If using cornflour, sprinkle 1 tbsp cornflour/cornstarch over the chicken.
Toss gently until the pieces have a very light coating.
You don’t want a thick batter.
Why use cornflour?
It creates a thin coating that helps:
- develop golden edges
- improve browning
- give the chicken a lightly crisp exterior
- help the glaze cling to the chicken
🍳 Step 5 — Pan-Cook the Chicken
Heat a large heavy-bottomed frying pan or skillet over medium-high heat.
Add:
- 1 tbsp oil
- 1 tbsp butter
Allow the butter to melt and foam.
The pan should be hot, but the butter should not be smoking or burning.
Add the chicken
Place the chicken pieces into the pan in a single layer.
Do not overcrowd the pan.
If necessary, cook in two batches.
🔥 First side
Leave the chicken undisturbed for approximately 2–3 minutes.
This allows a golden crust to develop.
When the underside is golden brown, turn the pieces.
🔥 Second side
Cook another 2–3 minutes.
Continue turning the pieces occasionally until they’re cooked through and beautifully browned.
Depending on the size of your pieces, total cooking time will generally be around 8–12 minutes.
The safest indicator is internal temperature: chicken should reach 74°C / 165°F in the thickest piece.
🧈 Step 6 — Make the Signature Lemon-Garlic Glaze
Once the chicken is cooked, reduce the heat to medium-low.
You can remove the chicken temporarily if the pan is very dry or has browned bits that are getting too dark.
Add:
- 1 tbsp butter
- 1 tsp minced garlic
Cook for about 20–30 seconds.
The garlic should become fragrant but must not turn dark brown.
Add:
- 1–2 tbsp lemon juice
- 1 tsp honey
- 1–2 tbsp water or chicken stock
- black pepper
- chili flakes, if using
Stir and allow the mixture to bubble gently for approximately 30–60 seconds.
The sauce should become slightly glossy.
⚠️ Don’t burn the garlic
Garlic cooks very quickly.
If it becomes dark brown or smells bitter, discard the glaze and start again. Burnt garlic can ruin the entire dish.
🍋 Step 7 — Toss Everything Together
Return the cooked chicken to the pan.
Increase the heat slightly and toss the chicken through the glaze for 30–60 seconds.
Keep tossing until every piece is coated.
The sauce should cling to the chicken rather than remain watery at the bottom of the pan.
Turn off the heat.
Finish with:
- fresh parsley or coriander
- a little lemon zest
- freshly cracked black pepper
Taste and adjust.
If it is too sour, add a tiny amount of honey or butter.
If it tastes flat, add a small pinch of salt.
If you want more freshness, add a few drops of fresh lemon juice after turning off the heat.
🌿 Step 8 — Serve Immediately
Transfer the chicken to a serving plate while it’s still hot.
Garnish with fresh herbs and serve with lemon wedges.
🍚 Best Pairings
Simple
- Steamed basmati rice
- Garlic rice
- Jeera rice
Comfort food
- Mashed potatoes
- Roasted potatoes
- French fries
Creamy
- Creamy pasta
- Garlic parmesan pasta
- Buttered noodles
Quick meal
- Warm pita
- Tortilla wraps
- Flatbread
Fresh option
Serve with:
- cucumber salad
- green salad
- roasted vegetables
- sautéed broccoli
🔥 Air-Fryer Method
If you prefer a lighter, crispier version:
- Preheat the air fryer to 190°C / 375°F.
- Lightly spray the basket with oil.
- Arrange the marinated chicken in a single layer.
- Cook for approximately 10–12 minutes.
- Shake or turn the chicken halfway through.
- Check that the thickest piece reaches 74°C / 165°F.
- Make the lemon-garlic glaze separately in a small pan.
- Toss the cooked chicken in the glaze just before serving.
Tip: Don’t pour excess wet marinade into the air fryer basket. It can prevent proper browning.
🍗 Oven Method
For batch cooking:
- Preheat oven to 200°C / 400°F.
- Line a baking tray with parchment paper.
- Arrange chicken pieces with space between them.
- Lightly brush or spray with oil.
- Bake for approximately 15–18 minutes, depending on piece size.
- Turn halfway through.
- Check the internal temperature.
- Toss with the freshly prepared lemon-garlic glaze.
For more color, you can place the chicken under the broiler/grill for the final 1–2 minutes, watching carefully.
🧠 The Secret to Restaurant-Style Chicken
There are five important rules:
1. Dry the chicken
Wet chicken steams instead of searing.
2. Don’t overcrowd the pan
Too many pieces lower the temperature and prevent browning.
3. Don’t constantly stir
Give each side time to develop color.
4. Protect the garlic
Garlic should become fragrant, not burnt.
5. Add fresh lemon at the end
Cooking lemon for too long can make the flavor flatter. Fresh lemon added to the finished dish gives a brighter taste.
⚠️ Common Problems & Fixes
❌ Chicken is dry
Cause: Overcooking or pieces cut too small.
Fix: Use thigh meat, keep pieces around 1–1½ inches, and cook only until the center reaches 74°C / 165°F.
❌ Chicken isn’t browning
Cause: Wet chicken, overcrowded pan, or insufficient heat.
Fix: Pat chicken dry, drain excess marinade, use a hot pan, and cook in batches.
❌ Chicken tastes too sour
Cause: Too much lemon.
Fix: Add a little honey and butter to the glaze.
❌ Garlic tastes bitter
Cause: Burnt garlic.
Fix: Reduce the heat before adding garlic and cook it briefly.
❌ Chicken releases lots of liquid
Cause: Overcrowding or adding too much wet marinade to the pan.
Fix: Cook in batches and shake off excess marinade before searing.
❌ Glaze is watery
Cause: Too much liquid.
Fix: Let it bubble for another 30–60 seconds until slightly reduced.
🌶 Flavor Variations
🔥 Spicy Lemon Garlic
Add:
- ½–1 tsp extra chili flakes
- ¼ tsp cayenne pepper
- ½ tsp hot sauce
Finish with fresh chili slices.
🍯 Sticky Honey Lemon Chicken
For a sweeter version, use:
- 1½–2 tbsp honey
- 1 tbsp lemon juice instead of 2 tbsp in the glaze
Reduce the sauce until glossy and sticky before adding the chicken.
🧀 Creamy Lemon Garlic Chicken
After cooking the chicken:
- Make the garlic-lemon butter sauce.
- Reduce the heat to low.
- Add 3–4 tbsp cream.
- Stir gently.
- Add 1–2 tbsp grated Parmesan if desired.
- Return chicken to the sauce.
- Simmer gently for 1–2 minutes.
This creates a rich creamy version that’s excellent with pasta or mashed potatoes.
🌿 Herb Lemon Chicken
Add to the finished dish:
- fresh parsley
- oregano
- thyme
- a little rosemary
Fresh herbs should be added near the end to preserve their aroma.
⭐ Final Result
The perfect Lemon Garlic Chicken Bite should have:
Outside: Golden, lightly crisp, caramelized edges
Inside: Juicy, tender, fully cooked chicken
Flavor: Bright lemon + savory garlic + buttery richness + subtle sweetness
Finish: Glossy glaze with fresh herbs and a little citrus
The most important technique is simple: marinate for flavor, dry before searing, don’t overcrowd the pan, and finish with a fresh lemon-garlic butter glaze.