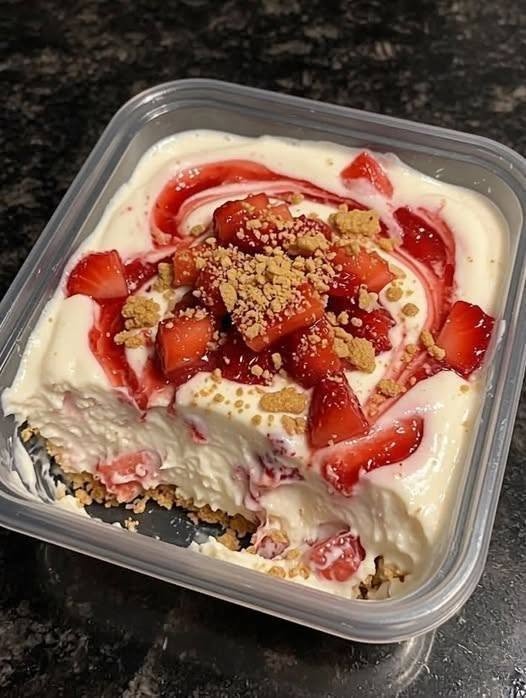

If you’re looking for an easy dessert that looks elegant but requires no oven, this No-Bake Strawberry Creamy Cheesecake is the perfect choice. With a buttery biscuit crust, an ultra-smooth cream cheese filling, fresh strawberries, and a glossy homemade strawberry topping, every bite is rich, creamy, fruity, and refreshing.
The best part? There’s absolutely no baking required. Simply prepare the crust, whip up the creamy filling, add the strawberries, and let the cheesecake chill until perfectly set.
This strawberry cheesecake is wonderful for summer parties, birthdays, family gatherings, afternoon tea, holidays, and special occasions. It can also be prepared a day ahead, making it an especially convenient dessert when you’re entertaining guests.
Why You’ll Love This No-Bake Strawberry Cheesecake
- No oven required: Perfect for warm-weather baking.
- Rich and creamy: Full-fat cream cheese and whipped cream create a luxurious texture.
- Fresh strawberry flavor: Strawberries are incorporated into the filling and topping.
- Easy to prepare: Simple ingredients and straightforward steps.
- Make-ahead friendly: It needs several hours to chill, so it’s ideal for preparing ahead.
- Beautiful presentation: Fresh berries and optional garnishes make it look bakery-worthy.
Ingredients
For the Biscuit Crust
- 2 cups digestive biscuit or graham cracker crumbs
- ½ cup (115 g) melted unsalted butter
- 2 tablespoons sugar, optional
For the Creamy Cheesecake Filling
- 500 g (18 oz) full-fat cream cheese, softened
- 1 cup (240 ml) cold heavy whipping cream
- ¾ cup powdered sugar
- 1 teaspoon vanilla extract
- 1 tablespoon fresh lemon juice
- 1 cup fresh strawberries, finely chopped
For the Strawberry Topping
- 2 cups fresh strawberries, sliced
- ¼ cup sugar
- 1 tablespoon lemon juice
- 1 teaspoon cornstarch
- 2 tablespoons water
Optional Garnishes
- Fresh strawberries
- Whipped cream
- Fresh mint leaves
- White chocolate shavings
How to Make No-Bake Strawberry Creamy Cheesecake
Step 1: Prepare the Pan
Lightly grease an 8-inch or 9-inch springform pan.
You can also line the bottom with parchment paper. This makes removing the chilled cheesecake much easier and helps create a clean presentation.
Set the pan aside.
Step 2: Make the Biscuit Crust
Place the digestive biscuit or graham cracker crumbs in a large mixing bowl.
Pour in the melted butter and add the sugar if you prefer a slightly sweeter crust.
Mix thoroughly until the crumbs are evenly coated and the mixture resembles wet sand.
The crumbs should hold together when pressed between your fingers.
Step 3: Press the Crust into the Pan
Transfer the crumb mixture to the prepared springform pan.
Use the back of a spoon, a flat-bottomed glass, or the bottom of a measuring cup to press the crumbs firmly into an even layer.
Pay special attention to the edges and corners. A firmly packed crust will hold together much better when you slice the cheesecake.
Step 4: Chill the Crust
Place the crust in the refrigerator for 20–30 minutes.
This allows the melted butter to firm up and helps create a stable base for the cheesecake filling.
While the crust chills, prepare the creamy filling.
Make the Creamy Cheesecake Filling
Step 5: Beat the Cream Cheese
Place the softened cream cheese in a large mixing bowl.
Using an electric mixer, beat it for approximately 3–4 minutes, or until it becomes completely smooth and creamy.
Scrape down the sides of the bowl as needed.
Tip: Make sure the cream cheese is properly softened before mixing. Cold cream cheese can leave small lumps in the finished filling.
Step 6: Add the Sugar and Flavor
Add the powdered sugar, vanilla extract, and fresh lemon juice.
Beat again until everything is smooth and well combined.
The lemon juice adds a subtle brightness that balances the richness of the cream cheese and complements the strawberries.
Step 7: Whip the Heavy Cream
Pour the cold heavy whipping cream into a separate chilled bowl.
Using clean beaters, whip the cream until stiff peaks form.
When you lift the beaters, the whipped cream should hold its shape rather than immediately falling back into the bowl.
Important: Keep the cream cold for the best whipping results.
Step 8: Fold the Whipped Cream into the Cheesecake Mixture
Add the whipped cream to the cream cheese mixture.
Using a rubber spatula, gently fold the whipped cream into the cream cheese mixture.
Avoid vigorous stirring. Gentle folding helps preserve the air in the whipped cream and gives the cheesecake a lighter, smoother texture.
Step 9: Add the Fresh Strawberries
Add the finely chopped fresh strawberries to the cheesecake mixture.
Fold gently until the strawberries are evenly distributed throughout the filling.
Try not to crush the berries too much, as you want small pieces of strawberry throughout the creamy cheesecake.
Assemble the Cheesecake
Step 10: Fill the Chilled Crust
Remove the chilled crust from the refrigerator.
Spoon the strawberry cream cheese filling over the crust.
Spread it evenly using an offset spatula or the back of a spoon.
Step 11: Smooth the Surface
Carefully smooth the top of the cheesecake.
Gently tap the pan against the counter a few times to help release any large air pockets.
Don’t tap too aggressively, as you want to maintain the light texture of the filling.
Step 12: Chill Until Fully Set
Cover the cheesecake loosely with plastic wrap or foil.
Refrigerate for at least 6–8 hours, or preferably overnight.
This chilling time is essential because the cheesecake needs time to firm up enough to slice cleanly.
For the best results, make this cheesecake the day before serving.
How to Make the Strawberry Topping
Step 13: Cook the Strawberries
Place the sliced strawberries, sugar, and lemon juice in a small saucepan.
Cook over medium heat for approximately 5–7 minutes, stirring occasionally.
The strawberries will soften and release their natural juices.
Step 14: Prepare the Cornstarch Mixture
In a small bowl, combine the cornstarch and water.
Stir until completely smooth with no visible lumps.
Pour the cornstarch mixture into the saucepan with the strawberries.
Step 15: Thicken the Topping
Continue cooking for approximately 1–2 minutes, stirring gently.
The strawberry mixture should become noticeably thicker and glossy.
Remove from the heat and allow it to cool completely.
Important: Do not spread warm strawberry topping over the chilled cheesecake. Allow it to cool first to prevent softening the cheesecake filling.
Finish and Decorate the Cheesecake
Step 16: Remove the Cheesecake from the Pan
Once the cheesecake has chilled and fully set, carefully release the sides of the springform pan.
Transfer the cheesecake to a serving plate.
If necessary, run a thin knife around the edge before releasing the pan.
Step 17: Add the Strawberry Topping
Spread the completely cooled strawberry topping over the surface of the cheesecake.
You can spread it all the way to the edges or leave a small border of cheesecake visible for a more polished presentation.
Step 18: Garnish
Decorate the cheesecake with your favorite toppings.
Try:
- Fresh strawberry halves
- Whipped cream
- Mint leaves
- White chocolate shavings
- Thinly sliced strawberries
For an elegant finish, pipe small swirls of whipped cream around the edges and place a strawberry on each swirl.
Step 19: Slice and Serve
Use a sharp knife to cut the cheesecake into slices.
For especially clean slices, dip the knife into warm water, wipe it dry, and then cut. Clean and warm the knife between each slice.
Serve the cheesecake well chilled.
Expert Tips for the Best No-Bake Cheesecake
Use Full-Fat Cream Cheese
Full-fat cream cheese provides the richest flavor and firmest texture. Reduced-fat varieties may produce a softer filling.
Soften the Cream Cheese Properly
Room-temperature cream cheese blends much more smoothly with the powdered sugar.
Keep the Heavy Cream Cold
Cold heavy cream whips more easily and creates a stronger, more stable whipped texture.
Pack the Crust Firmly
A loosely packed crust may crumble when you cut the cheesecake.
Don’t Rush the Chilling Time
The cheesecake needs enough time to firm up. For the best results, refrigerate overnight.
Cool the Strawberry Topping
Always cool the topping completely before adding it to the cheesecake.
Don’t Overmix
Once the whipped cream is added, fold gently to maintain the light texture.
Delicious Variations
Chocolate Strawberry Cheesecake
Add a thin layer of melted chocolate or chocolate shavings over the crust before adding the cheesecake filling.
Strawberry White Chocolate Cheesecake
Fold finely chopped white chocolate into the filling and finish with white chocolate curls.
Mixed Berry Cheesecake
Replace some of the strawberries with raspberries, blueberries, or blackberries.
Lemon Strawberry Cheesecake
For a stronger citrus flavor, add extra lemon zest to the cream cheese filling.
Strawberry Vanilla Cheesecake
Add a little extra vanilla extract or vanilla bean paste for a deeper vanilla flavor.
Chocolate Biscuit Crust
Replace the digestive biscuits or graham crackers with chocolate cookie crumbs for a chocolate-strawberry combination.
Serving Suggestions
This cheesecake is delicious served straight from the refrigerator.
Pair it with:
- Fresh strawberries
- A cup of coffee
- Hot or iced tea
- Fresh mint
- Whipped cream
- Vanilla ice cream
- White chocolate curls
It’s especially beautiful when served on a dessert table surrounded by fresh berries.
Storage Instructions
Refrigerator
Store the cheesecake covered in the refrigerator for up to 4–5 days.
Because it contains cream cheese and whipped cream, keep it chilled until ready to serve.
Freezer
For longer storage, freeze the cheesecake without the fresh garnish.
Wrap it tightly and place it in a freezer-safe container. For best quality, enjoy within approximately 1 month.
Thaw overnight in the refrigerator before serving.
Frequently Asked Questions
Can I use frozen strawberries?
Fresh strawberries are recommended for the best texture, especially in the cheesecake filling. Frozen berries contain more moisture and can make the filling softer.
Can I make this cheesecake a day ahead?
Yes! In fact, making it the day before is one of the best ways to prepare this dessert. The extra chilling time allows the filling to firm up properly.
Why is my no-bake cheesecake too soft?
It may not have chilled long enough, or the whipped cream may not have been whipped to stiff peaks. Make sure to refrigerate the cheesecake for at least 6–8 hours.
Can I use graham crackers instead of digestive biscuits?
Yes. Graham cracker crumbs work beautifully and provide a classic cheesecake crust.
Can I reduce the sugar?
Yes, you can slightly reduce the sugar according to your taste. Keep in mind that this may change the overall sweetness and balance of the dessert.
Do I have to use a springform pan?
A springform pan makes removal much easier, but you can also use a deep pie dish or another suitable dessert pan. Line the pan with parchment if you want easier serving.
Can I skip the strawberry topping?
Absolutely. The cheesecake is delicious with fresh strawberries on top, but the cooked strawberry topping adds extra flavor and a beautiful glossy finish.
Recipe Card
No-Bake Strawberry Creamy Cheesecake
Prep Time: 30 minutes
Chilling Time: 6–8 hours
Total Time: About 7 hours
Pan: 8–9 inch springform pan
Servings: Approximately 8–12 slices
Ingredients
Crust
- 2 cups digestive biscuit or graham cracker crumbs
- ½ cup (115 g) melted unsalted butter
- 2 tbsp sugar, optional
Filling
- 500 g full-fat cream cheese
- 1 cup cold heavy whipping cream
- ¾ cup powdered sugar
- 1 tsp vanilla extract
- 1 tbsp fresh lemon juice
- 1 cup finely chopped strawberries
Strawberry Topping
- 2 cups sliced strawberries
- ¼ cup sugar
- 1 tbsp lemon juice
- 1 tsp cornstarch
- 2 tbsp water
Instructions
- Prepare and line an 8–9 inch springform pan.
- Combine biscuit crumbs, melted butter, and optional sugar.
- Press firmly into the pan and refrigerate for 20–30 minutes.
- Beat softened cream cheese until smooth.
- Add powdered sugar, vanilla, and lemon juice.
- Whip cold heavy cream until stiff peaks form.
- Gently fold whipped cream into the cream cheese mixture.
- Fold in the chopped strawberries.
- Spread the filling evenly over the chilled crust.
- Refrigerate for at least 6–8 hours or overnight.
- Cook sliced strawberries, sugar, and lemon juice for 5–7 minutes.
- Stir in the cornstarch slurry and cook for another 1–2 minutes.
- Cool the strawberry topping completely.
- Remove the chilled cheesecake from the pan.
- Spread the strawberry topping over the cheesecake.
- Garnish with fresh strawberries, whipped cream, mint, or white chocolate.
- Slice and serve chilled.
Final Thoughts
This No-Bake Strawberry Creamy Cheesecake is everything you want in an easy summer dessert: creamy, fruity, refreshing, elegant, and completely oven-free.
The buttery biscuit crust provides the perfect foundation for the smooth cream cheese filling, while fresh strawberries add bright flavor throughout. The homemade strawberry topping brings everything together with a beautiful glossy finish.
Whether you’re preparing dessert for a birthday, summer gathering, holiday celebration, or simply treating your family to something special, this cheesecake is an easy recipe that looks and tastes impressive.
Chill it overnight, decorate it with plenty of fresh strawberries, and enjoy every creamy, fruity bite! 🍓🍰✨