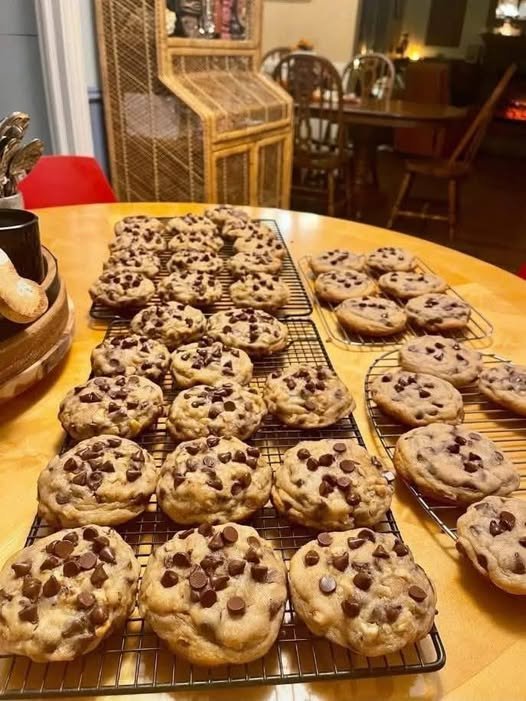

These Thermomix Chocolate Chip Cookies are a classic homemade treat with crisp, golden edges, soft centers, and plenty of delicious chocolate chips in every bite. Made with simple pantry staples and prepared quickly in the Thermomix, they are perfect for busy families, afternoon snacks, and lunch boxes.
With only a few minutes of preparation and around 8–10 minutes of baking time, these cookies are an easy treat whenever a sweet craving strikes. Even better, the dough and baked cookies are both freezer-friendly, making them ideal for preparing ahead.
Why You’ll Love This Recipe
- Quick & Easy: The Thermomix makes preparing the cookie dough incredibly simple and fast.
- Perfect for Lunch Boxes: Kids will love discovering these homemade chocolate chip cookies in their lunch boxes.
- Simple Ingredients: This recipe uses everyday pantry and refrigerator staples.
- Crispy Outside, Soft Inside: The combination of caster sugar and brown sugar creates a wonderful cookie texture.
- Freezer-Friendly: Freeze the unbaked dough or baked cookies for an easy treat later.
- Family Favorite: These classic cookies are perfect for sharing with the whole family.
Recipe Details
Prep Time: 5 minutes
Chilling Time: 15 minutes
Cook Time: 8–10 minutes
Total Time: Approximately 28–30 minutes
Servings: 24 cookies
Course: Snack
Cuisine: Cookies
Calories: Approximately 131 kcal per cookie
Ingredients
You only need a handful of simple ingredients to make these delicious Thermomix cookies.
- 150 g butter, softened to room temperature
- 80 g caster sugar
- 80 g brown sugar
- 1 large egg
- 2 teaspoons vanilla extract
- Pinch of salt
- ½ teaspoon bicarbonate of soda (baking soda)
- 225 g plain flour (all-purpose flour)
- 220 g chocolate chips or chocolate bits
Ingredient Notes
Butter: Salted or unsalted butter can be used. If using salted butter, you can reduce or omit the additional pinch of salt.
Sugars: Caster sugar contributes to the crisp edges, while brown sugar adds moisture and a softer texture.
Vanilla: Vanilla extract, vanilla essence, or vanilla bean paste can be used.
Chocolate Chips: Regular chocolate chips or chocolate bits work perfectly. For a fun variation, you can use Smarties, M&Ms, or other small chocolate candies.
Equipment
- Thermomix
- Butterfly attachment
- 2 flat baking trays
- Baking paper
- Wire cooling rack
How to Make Thermomix Chocolate Chip Cookies
Step 1: Preheat the Oven
Preheat your oven to 170°C fan-forced.
Line two flat baking trays with baking paper and set aside.
Step 2: Cream the Butter and Sugars
Insert the butterfly attachment into the Thermomix bowl.
Add the softened butter, caster sugar, and brown sugar.
Mix on Speed 4 for 20 seconds.
Scrape down the sides of the bowl, then mix again on Speed 4 for 40 seconds, or until the mixture becomes pale, smooth, and creamy.
Step 3: Add the Egg and Vanilla
Reduce the speed to Speed 2.
Add the egg and vanilla extract through the MC hole.
Increase to Speed 4 and mix for 15 seconds.
Remove the butterfly attachment.
Step 4: Add the Dry Ingredients
Add the salt, bicarbonate of soda, and plain flour.
Mix on Speed 4 for 10 seconds.
Scrape down the sides of the bowl, then mix for another 5 seconds, or just until combined.
Avoid overmixing the dough.
Step 5: Add the Chocolate Chips
Add the chocolate chips to the bowl.
Mix on REVERSE, Speed 2 for 10 seconds, or until the chocolate chips are evenly distributed throughout the dough.
Use the Thermomix spatula if necessary to help combine the mixture.
Step 6: Chill the Dough
For the best results, refrigerate the cookie dough for at least 15 minutes.
Chilling helps prevent the cookies from spreading too much during baking and helps them maintain a thicker, more attractive shape.
Step 7: Shape the Cookies
Roll the dough into heaped teaspoon-sized balls.
Place the balls onto the prepared baking trays, leaving enough space between them because the cookies will spread during baking.
Step 8: Bake
Bake for approximately 8–10 minutes, or until the edges are lightly golden.
Be careful not to overbake them. The cookies may still look slightly soft in the center when you remove them from the oven, but they will continue to firm up as they cool.
Step 9: Cool
Allow the cookies to cool on the baking trays for approximately 10 minutes.
Then carefully transfer them to a wire rack and allow them to cool completely.
Tips for Perfect Thermomix Chocolate Chip Cookies
Chill the Dough
Although chilling isn’t absolutely essential, it is highly recommended. A short 15-minute chill helps prevent excessive spreading and produces thicker, better-shaped cookies.
Use Room-Temperature Butter
Softened butter creams more easily with the sugars and creates a smoother cookie dough.
Avoid using butter that is completely melted.
Don’t Overmix
Once the flour is added, mix only until the ingredients are combined. Overmixing can result in cookies that are less tender.
Leave Space Between Cookies
The dough spreads during baking, so don’t place the cookie dough balls too close together.
Don’t Overbake
For soft-centered cookies, remove them when the edges are lightly golden and the centers still look slightly soft.
Fun Variations
M&M Chocolate Chip Cookies
Replace some or all of the chocolate chips with colorful M&Ms for a fun family-friendly version.
Double Chocolate Cookies
Add cocoa powder to the dough and use chocolate chips for an extra-rich chocolate cookie.
White Chocolate Cookies
Replace the regular chocolate chips with white chocolate chips for a sweeter variation.
Nutty Chocolate Chip Cookies
Add chopped walnuts, pecans, or almonds for extra crunch.
Triple Chocolate Cookies
Use a combination of milk, dark, and white chocolate chips for an indulgent treat.
Perfect for Lunch Boxes
These cookies make a wonderful homemade lunch-box treat. Their classic chocolate flavor makes them especially popular with children, while the simple ingredients make them an easy homemade alternative to packaged cookies.
For lunch boxes, allow the cookies to cool completely before packing them in an airtight container.
How to Store
Store completely cooled cookies in an airtight container at room temperature.
They can stay fresh for approximately 1 week when stored properly.
For the best texture, keep them away from moisture and make sure the container is tightly sealed.
Can You Freeze the Cookie Dough?
Yes! This recipe is excellent for freezer preparation.
Roll the unbaked dough into individual cookie balls and place them in a freezer-safe container or bag.
Freeze for up to 3 months.
When ready to bake, you can bake the frozen dough directly, although you may need to add a little extra baking time. Alternatively, allow the dough to thaw in the refrigerator before baking.
Can You Freeze Baked Cookies?
Absolutely.
Allow the cookies to cool completely before placing them in an airtight, freezer-safe container.
Freeze for up to 1 month.
Allow them to thaw at room temperature before serving.
Frequently Asked Questions
Can I use salted butter?
Yes. Salted butter works well in this recipe. If using salted butter, consider reducing the additional salt.
Can I use different types of chocolate?
Definitely. Milk chocolate, dark chocolate, white chocolate, or a combination can all be used.
Why should I chill the dough?
Chilling firms the butter in the dough, helping reduce excessive spreading during baking and producing thicker cookies.
Why are my cookies spreading too much?
The dough may have been too warm, the butter may have been too soft, or the dough may have needed additional chilling. Try refrigerating the dough for longer before baking.
How do I keep the cookies soft?
Avoid overbaking them. Remove them when the edges are lightly golden and the centers still appear slightly soft.
Can I make smaller or larger cookies?
Yes. Just remember that baking time will need to be adjusted. Smaller cookies will generally bake faster, while larger cookies will need additional time.
Nutrition Information
Approximate nutrition per cookie:
- Calories: 131 kcal
- Carbohydrates: 17 g
- Protein: 1 g
- Fat: 7 g
- Saturated Fat: 4 g
- Polyunsaturated Fat: 1 g
- Monounsaturated Fat: 1 g
- Trans Fat: 1 g
- Cholesterol: 22 mg
- Sodium: 73 mg
- Potassium: 19 mg
- Fiber: 1 g
- Sugar: 9 g
- Vitamin A: 166 IU
- Calcium: 7 mg
Nutrition values are estimates and may vary depending on the specific brands and ingredients used.
Recipe Card
Thermomix Chocolate Chip Cookies
Ingredients:
- 150 g room-temperature butter
- 80 g caster sugar
- 80 g brown sugar
- 1 egg
- 2 teaspoons vanilla extract
- Pinch of salt
- ½ teaspoon bicarbonate of soda
- 225 g plain flour
- 220 g chocolate chips
Instructions:
- Preheat oven to 170°C fan-forced and line two baking trays.
- Insert the butterfly attachment into the Thermomix bowl.
- Add butter, caster sugar, and brown sugar. Mix Speed 4, 20 seconds.
- Scrape the bowl and mix Speed 4, 40 seconds, until pale and creamy.
- Reduce to Speed 2 and add egg and vanilla through the MC hole.
- Increase to Speed 4 and mix for 15 seconds.
- Remove the butterfly attachment.
- Add salt, bicarbonate of soda, and flour. Mix Speed 4, 10 seconds.
- Scrape the bowl and mix for another 5 seconds.
- Add chocolate chips and mix REVERSE, Speed 2, 10 seconds.
- Chill the dough for at least 15 minutes.
- Roll into heaped teaspoon-sized balls and place on the prepared trays.
- Bake for 8–10 minutes, or until lightly golden.
- Cool on the trays for 10 minutes.
- Transfer to a wire rack and cool completely.
Final Thoughts
These Thermomix Chocolate Chip Cookies are everything you want in a classic homemade cookie: simple, buttery, chocolatey, slightly crisp around the edges, and wonderfully soft in the center.
Thanks to the Thermomix, the dough comes together quickly with minimal effort, making these cookies perfect for busy weekdays, family baking days, lunch boxes, afternoon snacks, or whenever you need an easy homemade sweet treat.
Keep a batch in the freezer for later, or bake them fresh and enjoy them with a glass of milk, a cup of tea, or your favorite coffee. 🍪🍫✨